In a previous post I discussed ways in which AOP can help in defining our architecture, even allowing us to verify architectural rules at compile time.
While this approach certainly does work, it has a few drawbacks, like its reliance on AOP, which is not always an option. Furthermore, the way these rules are defined is slightly unnatural.
A more idiomatic way of automatically verifying one’s architecture is ArchUnit, which enables us to define our rules as unit tests.
Originally a Java library, the project has since been ported to C#, which makes sense, considering Java Kotlin and C# are the same language. If a truly useful library is created in either of these, it will eventually be ported to the others, just like for AspectJ we now got PostSharp.
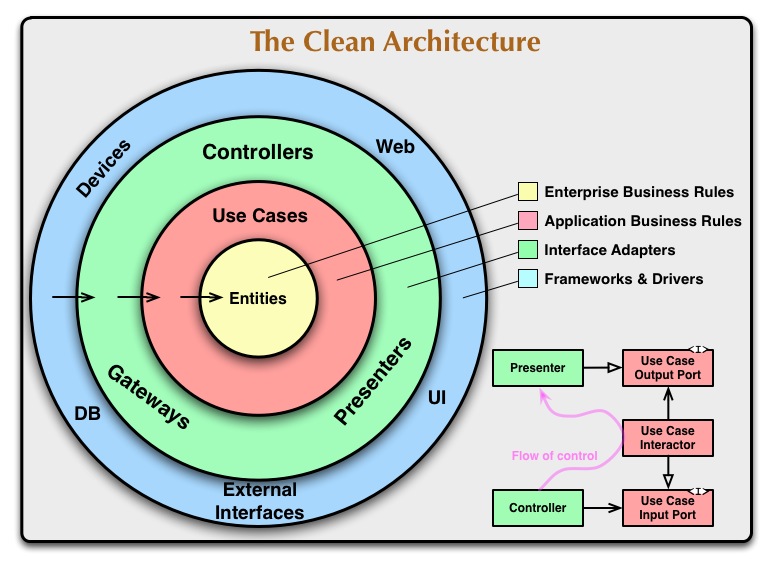
Anyway, this is convenient for me, since I wanted to take a look at enforcing a clean architecture in C# today. (Please read Uncle Bob’s post)
In the Java ArchUnit, there is out of the box support for both layered and onion architectures, but not in the dotnet ports.
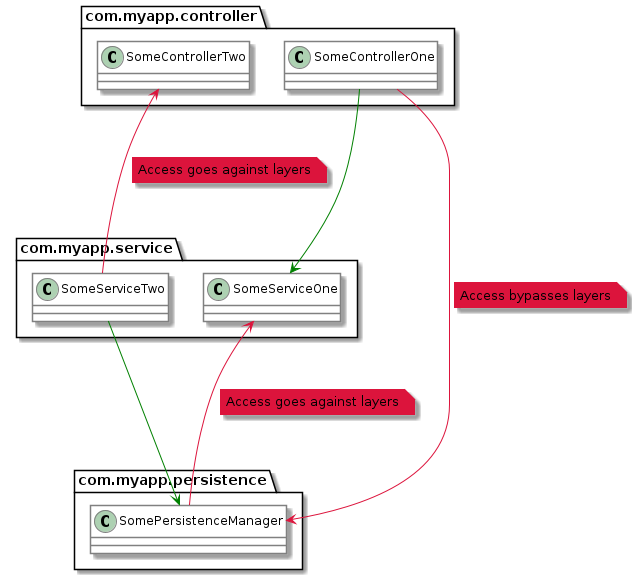
I won’t be going for a full-blown onion / clean arch as my purpose is to slowly evolve and improve the architecture of my project. Taking things from 0 to 100 in one step is likely not gonna benefit anyone, and it is easier to adapt to small, incremental changes. So, while the end goal is a clean architecture, for now I just want to implement some simple layer checks, similar to the ones shown in the image below.
ArchUnit provides an elegant way of defining architectural rules, helping you enforce your design. Whilst the AOP compile-time approach is great, too, I prefer an AOP-independent solution.
It would be great to have the layer and onion dsl ported to C#, too.
I will be experimenting with the layers and slowly approach a clean architecture.
I am happy to announce that we have migrated from JCenter to Maven Central, and are releasing version 3.2.0 with new features, including plain class support and constructor injection. Before we dive into the news, I want to take a look back at how we got here.
Throughout its lifetime, Arkenv has offered many great learning opportunities, and having the chance to create such a project is something I wish upon every developer.
Even though it is in no way a complex, or groundbreaking venture, I still consider it an important stepping stone, being my first open-source library. Keeping the scope small and manageable is probably an advantage when starting out.
Background
There were two primary reasons for the conception of Arkenv.
Firstly, we were looking for a way to seamlessly bridge the changing configuration needs in different environments with minimal developer intervention. Starting out with command line libraries like JCommander, we soon realized that we wanted a central abstraction to define our external configuration, which didn’t depend on the configuration source. Pretty much like Environment in Spring.
For example, we wanted to be able to go from a command line-driven environment to an environment variable-driven one without having to add code or recompile.
Secondly, I really wanted to try to build something with Kotlin delegates. Another issue we had with many existing, annotation-based libraries, was the lack of type-safety and null support. Quickly, we saw that delegates were a perfect fit for these criteria, and the first version with CLI and ENV support didn’t fill more than a few lines.
The idea was to declare an immutable property, with nullability indicating whether it is optional or not, and whose name is used to resolve it.
valport:Intbyargument()
Once declared, it can be provided via CLI --port 443, environment variable PORT=443, or in a profile (properties, yaml) port: 443.
With the announcement of JCenter ending support of their popular repository, many open-source projects had to migrate to Maven Central. We could have lived without this interruption, but on the other hand, it is great to be able to go with the default repository.
From now on, all new releases will be available here.
repositories{mavenCentral()}implementation("com.apurebase","arkenv","3.2.0")implementation("com.apurebase","arkenv-yaml","3.2.0")// for yaml support
New features
Plain class support
It is no longer necessary to extend Arkenv when defining an argument class.
Plain classes do not have a help argument by default.
Constructor injection
Instead of declaring arguments, one can now let Arkenv inject directly into the constructor of a plain class.
classConfiguration(valport:Int)// construct an instance with the parse factory functionvalconfiguration=Arkenv.parse<Configuration>(args)
Consequently, we cannot apply any config to these arguments, but default values are supported natively.
Modules
The above approaches can be combined freely, and both support modules, too. In plain classes, modules are declared with a delegate, i.e. by module(). The module delegate function also accepts a configuration lambda with prefix support.
classSubConfig(valcountry:String){valport:Intbyargument()}objectConfiguration{valsubModulebymodule<SubConfig>()}Arkenv.parse(Configuration,args)Configuration.subModule.port// member access
The above SubConfig class accepts constructor parameters and declares arguments in its body.
The Configuration object declares a module that is automatically created on parse.
Most extension functions have moved to the util package. This will break your build when upgrading, but should be easy to fix, by importing the correct packages.
One of my favorite features of the x++ programming language is the ability to extend classes by creating a chain of command, also referred to as CoC.
It allows multiple consumers to seamlessly augment existing code side-by-side with minimal work required from the owner.
This is especially valuable for software where customization is the norm and multiple independent parties want to customize the same code.
The result is a flexible extension model conforming to the open/closed principle.
Extending code
Given a class OrderSubmitService as defined below, we want to customize the validation behavior when an order is submitted.
Inheritance is not an option, as the class is final. Furthermore, this approach requires that the class can be substituted at its call site, which is often not possible.
// file: "OrderSubmitService.xpp"publicfinalclassOrderSubmitService// final class, no inheritance{protectedSimpleOrdersimpleOrder;publicvoidsubmitOrder(){if(this.validateOrder()){simpleOrder.submit();}}protectedbooleanvalidateOrder(){returnsimpleOrder.Amount>0;// we want to customize this}}
Ideally, we would like to just add our custom logic to the validateOrder method.
Next
In order to create a chain of command, we create a new class with the _Extension suffix and add a reference to the target class in the ExtensionOf attribute.
Then we are free to declare any public or protected methods from the target class and define custom behavior.
In the below example we add another validation step to the existing one.
// file: "OrderSubmitService_Extension.xpp"[ExtensionOf(classStr(OrderSubmitService))]publicfinalclassOrderSubmitService_Extension{protectedbooleanvalidateOrder(){booleanisAvailable=this.simpleOrder.IsAvailable;// access to protected membersreturnnextvalidateOrder()&&isAvailable;// calling next is mandatory}}
Calling next invokes the next extension in the chain, until it reaches the base implementation.
In this way, independent parties can add more layers of code on top of the core, which can be locked down to prevent unintended side effects.
Looking at the code, this seems oddly familiar.
Parallels
There are no other languages with CoC support, AFAIK, but one parallel came to mind.
We can achieve similar results with @Around advice in AOP as shown in the Kotlin Spring code below.
There are some major differences and changes needed to make this work, like not being able to access protected members, but otherwise it is really cool to observe the similarities here.
Calling next in x++ is required, but we can ignore the result in both. Both provide access to the target class.
Whereas AOP is commonly leveraged to address cross-cutting concerns, CoC addresses the cross-cutting concern of code extensibility in x++.
The extension model of x++ is of course much more than CoC. For example, you can also add state to classes via extensions. But I have to say, I really came to appreciate the power of the Chain of Command in creating elegant, extensible solutions with minimal boilerplate.
One idea I recently happened upon is handling feature switches in an aspect. Essentially, we want to externally control whether certain code should execute or not.
This is really a cross-cutting concern, and thereby a top contender for AOP! One way to identify candidates for AOP is looking for those small bits of code that are scattered around your code base which do not really contribute to the single responsibility of the class.
For feature switches it is annoying having to always inject some feature manager and start things off with:
valisEnabled=featureSwitchManager.isEnabled(feature)if(isEnabled){// actual code}
This is a kind of meta capability that our code shouldn’t have to worry about. Additionally, we are usually happier testing the code without all this extra noise.
The implementation is super simple. We define a pointcut for any public methods with the @FeatureSwitch annotation, and pass the provided feature name to the FeatureSwitchManager, implementing the actual feature check.
The more I learn about Spring, the more I come to understand and appreciate its true power, with one major appeal being developer productivity.
In my previous post I discussed some useful things we can do with aspect oriented programming, including logging. Spring covers many of these use cases out of the box, without any additional concepts or dependencies. Let’s explore how to configure a trace interceptor and how this can make us more productive.
Oftentimes, when we encounter a bug in the live application, we want to get a deeper understanding of what lead to the current state and turn to the logs. Now, during development we may not have decided upon and set up detailed logging, which leads us to add some additional logging or print statements to get insights into the erroneous process.
This costs time, is annoying, and is ultimately not a very lean process, as a better alternative is available. The premise is the following:
Automatically provide meaningful insights into the app. Configure once, applied seamlessly to any existing or new code without additional work.
Say you implement a new part of your app, including a service with one central method:
Now, during testing it turns out there is a bug which leads to inconsistent results, even though you are sure the input params are as expected.
Wouldn’t it be nice to have the following in your logs:
2020-09-27 13:32:51.404 TRACE 2220 --- [Test worker] m.a.y.s.TestService:Entering testMultiply(6,7)TEST!2020-09-27 13:32:51.654 TRACE 2220 --- [Test worker] m.a.y.s.TestService:Leaving testMultiply(), returned 42, running time = 250 ms
This includes a message on entering and leaving the method, with information about the parameters, the return value and the time spent. This can be customized further, but is usually a good starting point.
Logger configuration
Here is the corresponding logger configuration. Source available here.
@ConfigurationclassLoggerConfig{@BeanfuncustomizableTraceInterceptor()=CustomizableTraceInterceptor().apply{setUseDynamicLogger(true)setEnterMessage("Entering $[methodName]($[arguments])")setExitMessage("Leaving $[methodName](), returned $[returnValue], running time = $[invocationTime] ms")setExceptionMessage("Error $[methodName](), exception $[exception], running time = $[invocationTime] ms")}@BeanfunloggingAdvisor():Advisor{valpointcut=AspectJExpressionPointcut().apply{expression="""
execution (* (@org.springframework.stereotype.Service *).*(..))
|| execution (* (@org.springframework.stereotype.Component *).*(..))
""".trimIndent()}returnDefaultPointcutAdvisor(pointcut,customizableTraceInterceptor())}}
The details of the pointcut expression depend on what classes you want to target. I just wanted to know about all services and components.
Notice that we do not need any explicit Spring AOP dependency or any other application configuration. The entire trace logging is self-contained and can be deployed from day one. You can copy-paste this class, and it works immediately.
By default, the traces are logged as trace, so set the logging level accordingly. My application.yml contains the following during development, where the last part is my root package name.
logging:level:me.avo.yunyin:TRACE
Conclusion
No, or greatly reduced need to write debug statements! Thanks to proxying, your code stays clean, whilst Spring works its magic.
For production use, you will of course have to adapt your logging, but during development this is value for no money.
I will experiment further to see how far I can push this, but this will definitely be a part of every future app I work on.
I’ve seen a lot of resources regarding AOP for Java and / or Maven, but couldn’t find a lot about the Kotlin+Gradle combo. As for the Spring side, the Spring Initializr doesn’t even list the aop starter, which is apparently by design. So I decided to show a working solution for the mentioned stack. The code referenced can be found here.
Aspect oriented programming is a great way of defining cross-cutting concerns that can simplify your project and help establish your architecture.
Setup
First thing is to add the required dependencies to the build.
The spring aop starter is needed for defining aspects.
The aspectj plugin is needed for compile-time checks.
There are a bunch of gradle plugins, but most are outdated and lack proper documentation. The freefair plugin was the only one I could get to work, documentation here. Just add the post-compile-weaving plugin and set your aspectj version in gradle.properties.
Aspects
Now we can start writing a custom aspect. The example shows an aspect that monitors all activities by logging start and end events including the time elapsed and whether it succeeded or failed. Using @Around advice we can wrap all methods that match the defined pointcut in a try-catch-finally.
In order to define what methods the advice is applied to, pointcuts can be used to describe the architecture of the application. In the example we want to monitor all public methods in any service or repository, as well as any method annotated with a custom @Activity annotation.
Here is a demo service that would match these pointcuts:
@ServiceclassDemoService{@Activity// optional, can be used on methods outside of services / repositoriesfunrun(someBool:Boolean):String{...}funnoAnnotation(){...}}
Compile-time checks
AspectJ can be used to define compile-time checks that produce errors or warnings when matched. For example, we can introduce a check that ensures that no code from the java.sql or javax.sql package is called outside of a repository.
@AspectclassCheckAspect{@DeclareError("!Architecture.repository() && (call (* java.sql..*.*(..)) || call (* javax.sql..*.*(..)))")valjdbcOutsideRepository="Only call jdbc code from within repositories."}
When compiling the following function, the compiler will throw an error.
I am really happy with the results and the fact that the Spring team is pushing and actively promoting Kotlin as the language of choice. One issue that still remains is handling suspending functions with AOP, since proceed will return when suspending. Hopefully the fix makes it into the next release. Tracking issue here.
I was recently working on my NHK-Easy web crawler project, since the site got an update with a number of breaking changes. One of these changes was concerning the audio of the articles.
Previously, each article had a corresponding static .mp3 resource. The update introduced a new HLS (HTTP Live Streaming) media player, accompanied by a M3U8 playlist. Furthermore, I observed that the audio was now split into several ts file segments, which were loaded on demand.
I had never worked with these file types before, so off I went to google. However, it wasn’t exactly easy to find answers to my questions, which is why I decided to summarize my findings here, in case other people have similar issues. Also, I wanted to have a go at writing my first post.
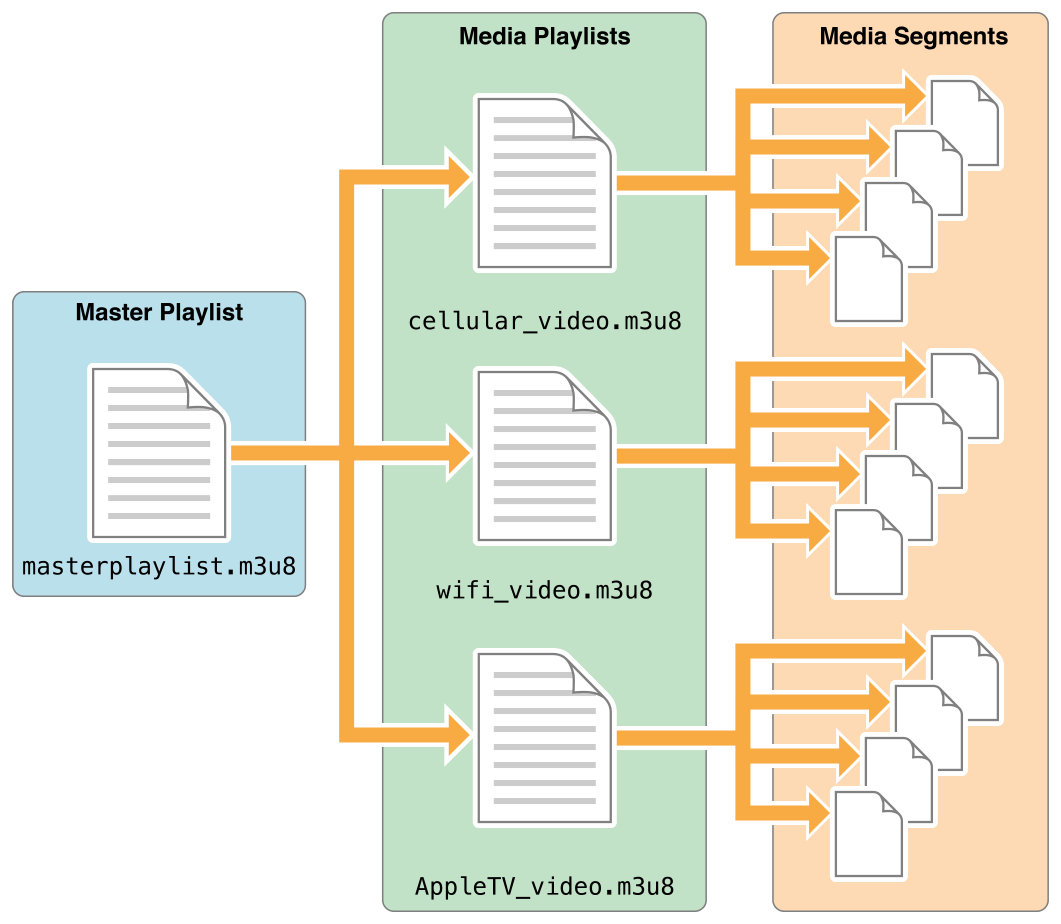
Given a master M3U8 playlist, the goal is to end up with a single mp3 file.
Master Playlist
The first step when dealing with M3U8, is parsing the master playlist.
I found the open-m3u8 library by iHeartRadio works best. The alternative is Comcast’s hlsparserj, but it lacks features and requires more manual work.
Once the master playlist is parsed, one can read its content, which consists of one or more media playlists.
Media Playlist
A typical media playlist could look like the following.
It contains an url for each segment that the stream is made up of. Additionally, there are a number of meta tags, of which one is particularly important.
Encryption
What took me the longest to figure out was that the segments were encrypted. According to specification, MPEG-TS files (.ts) start with a BOM (Byte Order Mark) in the form of the ASCII char G. What confused me was, that there was no G, since the files were encrypted. Lesson learned, go read the specification.
Here is how I handle the encryption.
fungetCipher(data:EncryptionData):Cipher{valbytes=URL(data.uri).readBytes()valchainmode="CBC"valmethod=when(data.method){EncryptionMethod.AES->"AES/$chainmode/NoPadding"else->data.method.name}valkeySpec=SecretKeySpec(bytes,data.method.name)logger.trace("Decrypting using method ${data.method} ($method)")returnCipher.getInstance(method).apply{init(Cipher.DECRYPT_MODE,keySpec,IvParameterSpec(ByteArray(16)))}}
EncryptionData can be obtained from any track of the media playlist.
Critical for the success of decryption were the chainmode and the NoPadding argument.
Without any of those, e.g. just AES, the decryption would throw.
With NoPadding, but a different chainmode, decryption would succeed, but the files were corrupted.
I simply used trial and error until I found the right combination.
Demux
MPEG-TS files are not the most ordinary media format and are therefore more difficult to work with. Instead of .ts files, it would be nice if we could just work with the audio as wav files. I have tried to find a way to do this in java, but ended up using FFMPEG because there was no suitable library for the job. There is JCodec, but the api is awkward and it doesn’t seem like the required format is supported. FFMPEG is pretty easy to use via cli and supports a range of formats.
To demux a .ts segment to a .wav file, simply use the below code, where the target is a .wav File.